DNS over HTTPS (DoH) is a relatively new protocol for performing DNS queries over the HTTPS protocol. With iOS 14 (and macOS Big Sur) now natively supporting DoH, you can now force your device to use a custom DNS server - even while you’re using cellular data. You’re no longer stuck using whatever DNS server your cellular carrier maintains.
Previously, the only way around a cellular carrier’s hard-coded DNS settings was to use a VPN to tunnel your traffic - a massive hassle. VPN is tricky to set up correctly, can be somewhat flakey while using cellular data, and negatively impacts both device battery life and connection speed. DoH is a massive improvement.
You don’t even need to run your own DoH server to take advantage of this new feature; there are plenty of public DoH servers and websites with pre-built configuration profiles. However, if you value privacy and the ability to tweak exactly which blocklists are used, setting up your own DoH server is relatively painless.
Instructions
While I’ve previously used PiHole at home, it doesn’t include a DoH server out of the box. It’s possible to combine PiHole with DoH Proxy, however it adds quite a bit of complexity.
A much simpler solution is AdGuard Home - an open source ad-blocking DNS server that is functionally the same as PiHole when it comes to blocking ads. In order to get this working, you will need to have:
- Your own domain name, with the ability to configure a subdomain.
- A virtual private server to run Docker & AdGuard Home on.
- For Digital Ocean, the $5 base droplet is more than adequate.
Any VPS provider should be able to handle AdGuard Home. I spun up a virtual machine on my colo server, but AWS, Linode, Vultr, etc would all work just as well. If you’re a new Digital Ocean customer, feel free to use my referral link to get a free $100 credit.
For the purposes of this tutorial, I’m using the subdomain dns.labzilla.io. You should replace this subdomain with your own in the instructions below.
Create your Virtual Machine
Create and deploy a virtual machine/droplet. For this tutorial, I’m using Digital Ocean to host an Ubuntu 18.04 droplet. Make a note of the IPv4/IPv6 addresses of your new virtual machine/droplet.
Get an IPv6 address if you are able
If it’s available on your VPS provider, you should request an IPv6 address as well as an IPv4 address. If you’re using Digital Ocean, check the IPv6 box under Additional Options when creating your droplet (otherwise you’ll need to manually configure the IPv6 interface).
- Most cellular carriers are running IPv6 networks and use carrier-grade NAT for IPv4 traffic. Having an IPv6 address allows you to bypass this, and should theoretically improve performance.
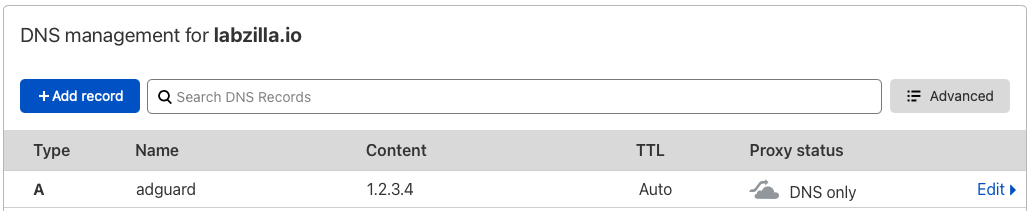
Specify your subdomain
Log in to your domain registrar, and configure a new DNS record to point to your server’s IP address. If you have an IPv6 address, don’t forget to create an AAAA record as well. If you’re using Cloudflare, make sure that their proxying is turned off.
Get an SSL Certificate
We’re using LetsEncrypt + Certbot to automatically request an SSL certificate for our AdGuard Home server.
SSH into your new virtual machine and use the command sudo apt-get install certbot to install Certbot.
- Start Certbot with the command
certbot certonly. When prompted, choose option 1 (spin up a temporary webserver). - Follow the rest of the prompts to obtain your server’s SSL certificate. Be sure to use the full subdomain that you created.
- When the process is finished, note the location of your certificate and key file (usually
/etc/letsencrypt/live/dns.labzilla.io/fullchain.pemand/etc/letsencrypt/live/dns.labzilla.io/privkey.pem) respectively.
Install Docker
Docker is the easiest way to install AdGuard Home. It allows us to expose only the bare minimum ports necessary for AdGuard Home to operate. Rather than re-inventing the wheel, follow this excellent tutorial and come back when you’re finished.
Enable IPv6 support in Docker
If you don’t have an IPv6 address, you can skip this step. Otherwise, if it doesn’t exist already, create a file at /etc/docker/daemon.json and add the following:
{
  "ipv6": true,
  "fixed-cidr-v6": "fd00::/80"
}
Save and close the file, and then restart Docker by running systemctl restart docker.
Install AdGuard Home
Now that Docker is installed, we can install Adguard Home:
docker run --name adguardhome \
-v adguard-work:/opt/adguardhome/work \
-v adguard-conf:/opt/adguardhome/conf \
-v /etc/letsencrypt/live/dns.labzilla.io/fullchain.pem:/etc/letsencrypt/live/dns.labzilla.io/fullchain.pem \
-v /etc/letsencrypt/live/dns.labzilla.io/privkey.pem:/etc/letsencrypt/live/dns.labzilla.io/privkey.pem \
-p 3000:3000/tcp \
-p 443:443/tcp \
-p 80:80/tcp \
-d --restart unless-stopped \
adguard/adguardhome
Be sure to modify the above commands to properly reference where your SSL certificate is stored.
Configure AdGuard Home
Access your new AdGuard instance by navigating to http://dns.labzilla.io:3000 in a browser. Follow the setup wizard to create a new account; don’t change anything from the default settings. After creating your new account, log in using the username and password you created.
SSL Configuration
Now that AdGuard Home is running, we need to configure it to use the SSL certificate we requested from Let’s Encrypt.
-
In the AdGuard Home admin panel, navigate to Settings > Encryption Settings.
-
Check the Enable Encryption box, and enter your server name (
dns.labzilla.io). Check the Redirect to HTTPS automatically box.

-
Under Certificates, chose Set a certificates file path and paste in
/etc/letsencrypt/live/dns.labzilla.io/fullchain.pem. -
Under Private Key, choose Set a private key file and paste in
/etc/letsencrypt/live/dns.labzilla.io/privkey.pem.
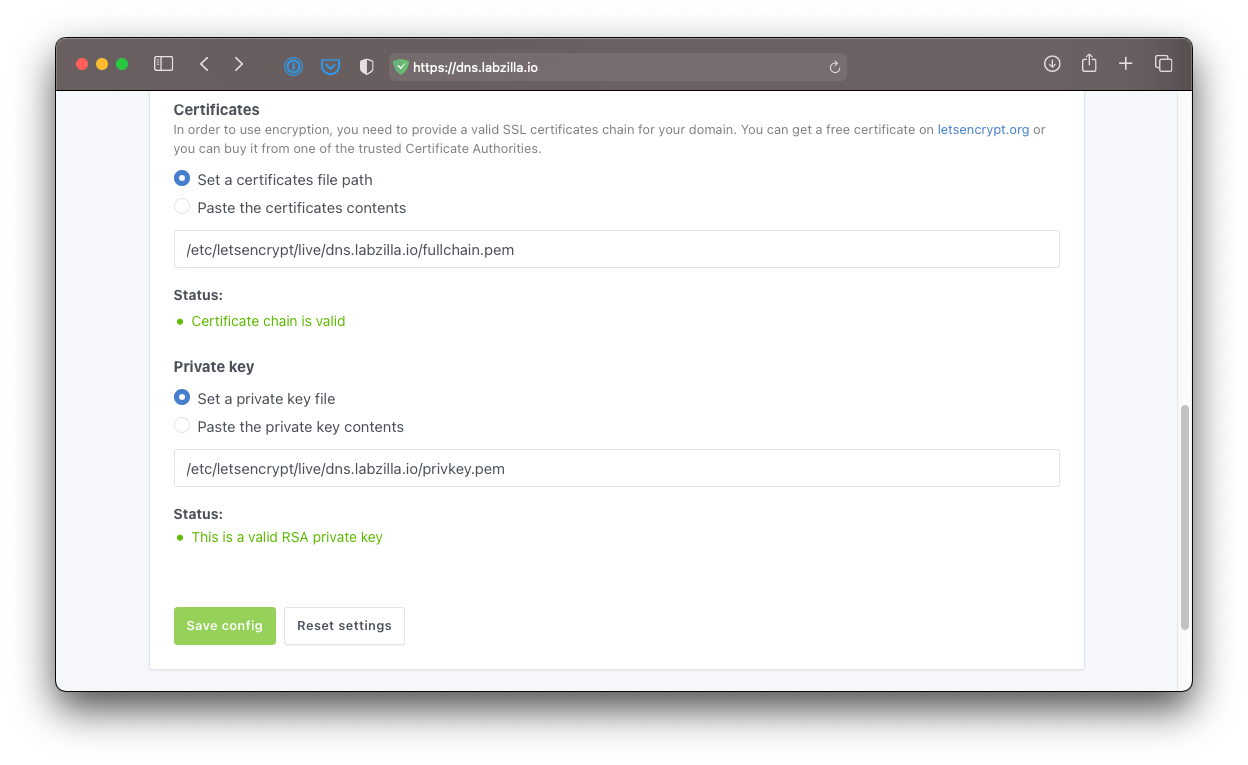
- Click Save Config. You should be automatically redirected to the HTTPS version of the AdGuard admin panel. When logging in to the admin panel in the future, use
https://dns.labzilla.io(no port number).
Other Settings
You probably will want to modify your upstream & bootstrap DNS servers in Settings > DNS Settings; I use 1.1.1.1 for both. You’ll definitely want to add your own blocklists; they’re configured under Filters > DNS blocklists (and are compatible with PiHole blocklists).
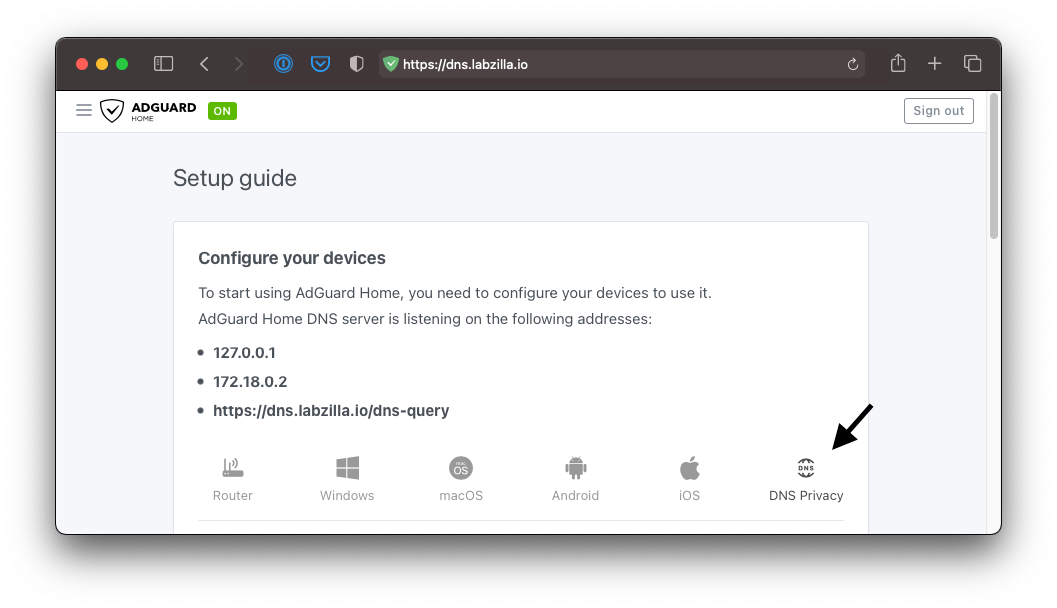
Download the mobile configuration profile
DNS over HTTPS is not configurable from within iOS settings or macOS system preferences. Instead, a mobile configuration profile is used to configure your device. AdGuard Home automatically generates a valid configuration profile with the appropriate settings. AdGuard Home’s website is mobile friendly, so it’s actually easiest to complete this step right from your iOS device. Alternatively, you can download the mobile configuration profile on your macOS device, and use AirDrop to transfer it.
- In the AdGuard admin panel, tap Setup Guide, and then tap DNS Privacy.
- If you’re on a mobile device, you may need to swipe left on the section with the icons for Router, Windows, macOS, etc. to see the DNS Privacy Option.
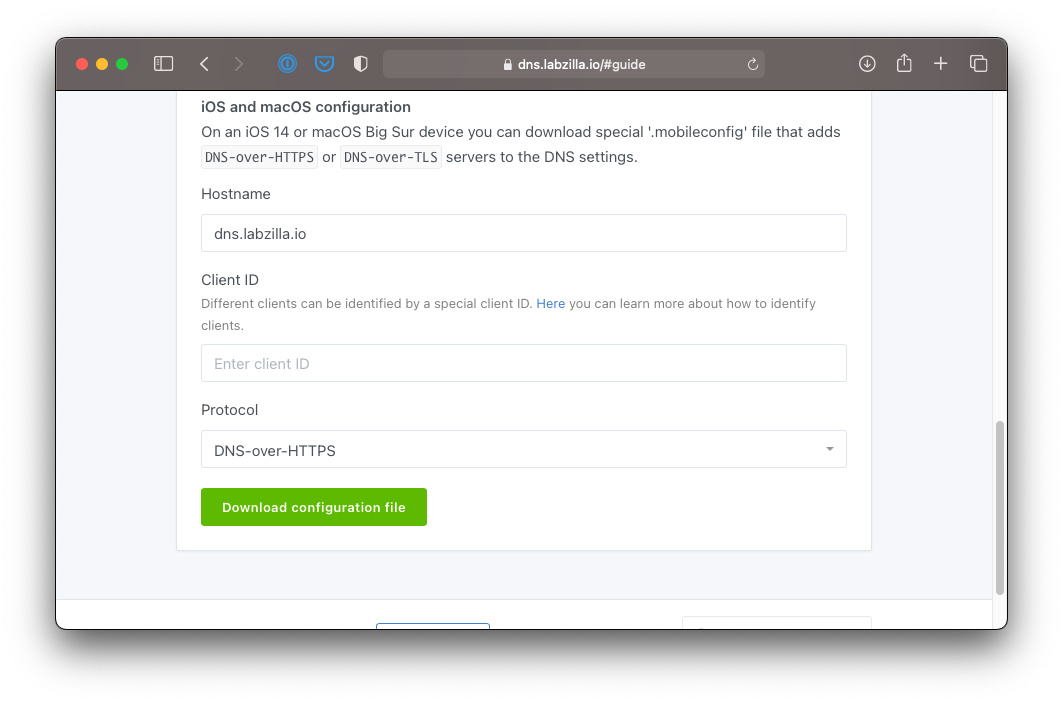
- At the bottom of the page, under iOS and macOS Configuration, enter in the host name (dns.labzilla.io) and optionally a client ID (no spaces or symbols).
- Tap the green Download Configuration File button. Tap Allow if prompted by your device.
- Install the configuration profile by navigating to Settings > Profile Downloaded.
- Tap Install, and then tap Install (again) to complete the installation.

To verify the DNS settings were correctly applied, open Settings and tap VPN & Network. A new section for DNS should be at the bottom of the window. Reverting the setting to Automatic will switch you back to your cellular provider’s DNS server. You should also see DNS queries from your device reflected in the query log inside AdGuard Home.
Recreate Docker container
Now that AdGuard Home as been configured, you no longer need to have ports 3000 or port 80 open to traffic.
The easiest way to address this is to delete and re-create the container. All of your configuration will be preserved.
Run the following commands to stop AdGuard Home and remove the existing container.
docker container stop adguardhomedocker container rm adguardhome
Recreate the container with the following:
docker run --name adguardhome \
-v adguard-work:/opt/adguardhome/work \
-v adguard-conf:/opt/adguardhome/conf \
-v /etc/letsencrypt/live/dns.labzilla.io/fullchain.pem:/etc/letsencrypt/live/dns.labzilla.io/fullchain.pem \
-v /etc/letsencrypt/live/dns.labzilla.io/privkey.pem:/etc/letsencrypt/live/dns.labzilla.io/
-p 443:443/tcp \
-d --restart unless-stopped \
adguard/adguardhome
You’ll notice that in this new configuration, only port 443 (HTTPS) is open to the outside world.
Test it out
You should see entries filling up the query log in AdGuard Home.
If you don’t, double check to make sure the configuration profile is installed, and then check Settings > VPN & Network > DNS to make sure that your device knows to use your new AdGuard Home server for DNS queries.
Removing the profile
If you need to completely remove the DoH configuration profile from your device, it’s relatively straightforward.
- iOS/iPadOS: Go to Settings > General > Profiles and Device Management. Locate the profile, and tap Remove Profile.
- macOS: System Preferences > Profiles. Locate the profile, and click the minus icon to remove it.
Advanced configuration
AdGuard Home generates a very basic configuration profile that enables DNS over HTTPS on iOS/macOS devices. The profile that is generated is always on, unless you manually turn it off by switching back to automatic DNS settings.
You don’t have to use the configuration profile that AdGuard Home generates - the DNS query string (https://dns.labzilla.io/dns-query) is the important part. You can create your own configuration profile (or modify the one AdGuard Home generates) to create more complex rules. For example, the configuration profile I currently use is set up to automatically switch back to the DNS server provided by my router’s DHCP server when I’m on my home network.