Home Assistant is an incredible piece of software. Through it’s powerful automation functionality, you can interface with devices from multiple manufacturers using completely different standards, and create extremely specific triggers, conditions, and subsequent actions.
I have a back door in my (one hundred year old) apartment that doesn’t always latch properly. More than once, I’ve walked back to the kitchen only to find the door ajar and my window AC working overtime. I already use the door sensors in conjunction with Home Assistant to automatically turn the lights on, so this project only required a few minutes of tinkering.
I’m using:
- Home Assistant (in a Docker container)
- Sonos speakers
- Samsung SmartThings door & window sensors
- GoControl HUSBZB-1 USB zigbee/z-wave hub
For the purposes of this guide, I’m assuming that you already have both the door sensors and your Sonos speakers set up in Home Assistant.
Configure the automation
Create a new automation by navigating to Configuration > Automations and clicking the ➕ icon down in the bottom right corner .
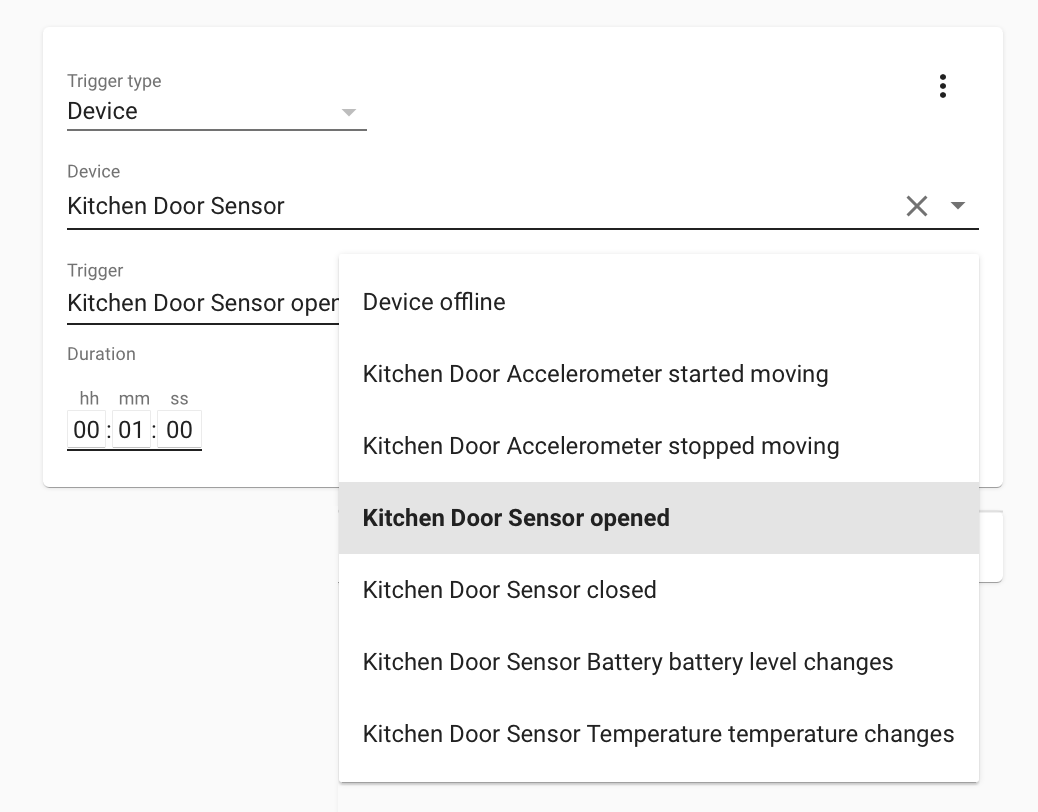
Trigger
For the trigger, select Device as the type, and chose Door Sensor Opened. Specify a duration for how long the sensor needs to be in the “Open” state before firing an alert. For one minute, use 00:01:00.
Action
The following actions tell Home Assistant to
- Save the current Sonos state.
- Set the volume to a predefined level.
- Group multiple Sonos speakers together to play the alert at the same time.
- Play a specific audio alert sound.
- Wait for the sound to finish.
- Resume playback of whatever was originally playing.
Save current queue
If I’m home, I usually have some music going over the Sonos system. Playing an alert chime over the Sonos will interrupt anything that’s playing (and replace the queue), which we don’t want. To get around this issue, Home Assistant can take a “snapshot” of what Sonos is playing (and at what volume) for the entire system. For Spotify, the music will resume where you left off. Unfortunately with Pandora, a new song on whatever station you were listening to will start instead.
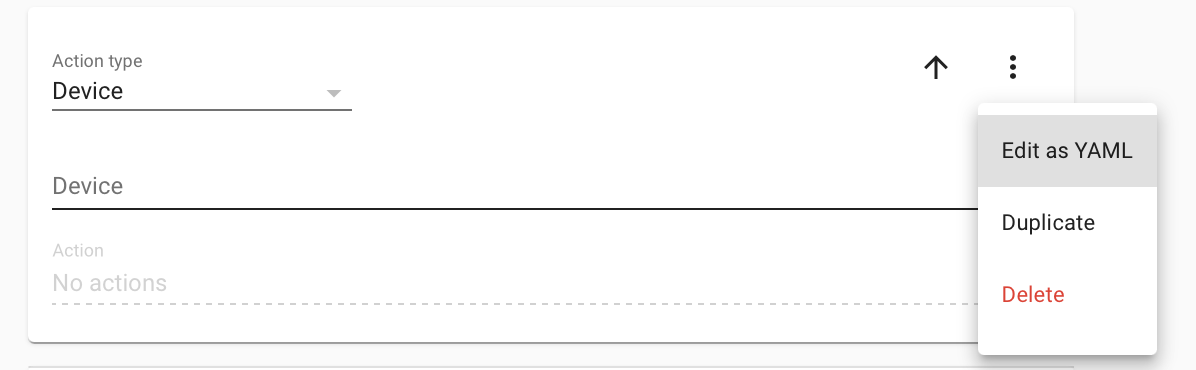
- Click Add Action, click the options menu (⋮) on the right side, and then click Edit as YAML.
-
Paste in the following code:
 data: {}
 entity_id: all
 service: sonos.snapshot
You will see a “UI editor is not supported for this config” warning - this is normal.
Set a global volume
Adjust the volume of the speakers to a predetermined level (so you don’t jump out of your skin).
-
Click Add Action, and change Action Type to Call Service. Select the
media_player.volume_setservice. -
Under Name(s) of entities to set volume on, find your Sonos speaker in the drop-down list.
For whatever reason, you can’t pick multiple items from the drop down, but you can manually type in multiple entities seperated with a comma and a space - for example:
media_player.living_room_sonos, media_player.bedroom_sonos, media_player.kitchen_sonos. -
Under service data, enter
volume_level: 0.2(20% volume - tweak as needed).
Group together multiple Sonos devices to play your announcement
I have multiple Sonos speakers in different rooms, and I want all of them to play the alert tone. You can accomplish this by grouping the speakers together. Pick one speaker to serve as the “Master,” and then specify the rest of your speakers. In my case, the living room speaker will be the master, and the bedroom and kitchen speaker will join.
-
Click Add Action, and change Action Type to Call Service. Select the
sonos.joinservice. -
Under Name(s) of entities that will join the master, list all of the speakers (except the master) that you want to play the alert through. In my case, that would be
media_player.kitchen_sonos, media_player.bedroom_sonos. -
Under Service Data, specify the master speaker:
master: media_player.living_room_sonos.
Play the announcement
I created a simple MP3 file with a chime and voice message:
The chime noise is from Notification Sounds, and the voice is from an online text-to-speech tool.
-
Click Add Action, and change Action Type to Call Service. Select the
media_player.play_mediaservice. -
Under Name(s) of entities to seek media on, specify the master speaker you designated in the previous step:
media_player.living_room_sonos. -
Under Service Data, specify the location of your media file and the content type:
  media_content_id: 'http://homeassistant.yourdomain.com:8123/local/kitchen-alert.mp3'
  media_content_type: music
You can stash your audio file in the /config/www folder, which translates to the http://homeassistant.yourdomain.com:8123/local/kitchen-alert.mp3 URL above. If you’re running Home Assistant in Docker, the www folder should be in the root of your Home Assistant Docker volume.
Wait for the announcement to finish
You need to tell Home Assistant to wait for the announcement sound to finish by creating a Delay action. The length of the delay should be about a second longer than the length of your alert sound.
- Click Add Action, and change Action Type to Delay. Enter your delay as HH:MM:SS. For a five second delay, use
00:00:05.
Get back to the music
Finally, have Home Assistant resume playing whatever it interrupted.
-
Click Add Action, click the options menu (⋮) on the right side, and then click Edit as YAML.
-
Paste in the following code:
 data: {}
 entity_id: all
 service: sonos.restore
Save your new automation
Click the 💾 icon in the bottom right to save your automation. You can go back to the Configuration > Automations screen, and click Execute to test it out. This is a good chance to see if the global volume you set previously is too loud/quiet.
Raw automations.yaml file
I posted this on Reddit’s /r/homeassistant, and a commenter suggested posting a snapshot of the revlevant part of the automations.yaml file. A screenshot of the entire automation config page is also available.
alias: 'Alert: Kitchen Door Open'
  description: ''
  trigger:
  - type: opened
    platform: device
    device_id: 0123456789abcdefg
    entity_id: binary_sensor.kitchen_door
    domain: binary_sensor
    for:
      hours: 0
      minutes: 1
      seconds: 0
  condition: []
  action:
  - data:
      data:
        priority: 1
        url: https://homeassistant.example.com
      message: The kitchen door was left open for longer than one minute.
      title: Kitchen Door Ajar
    service: notify.pushover
  - data: {}
    entity_id: all
    service: sonos.snapshot
  - data:
      volume_level: 0.2
    entity_id: media_player.living_room_sonos, media_player.bedroom_sonos, media_player.kitchen_sonos
    service: media_player.volume_set
  - data:
      master: media_player.living_room_sonos
    entity_id: media_player.bedroom_sonos, media_player.kitchen_sonos
    service: sonos.join
  - data:
      media_content_id: http://homeassistant.example.com:8123/local/kitchen-alert.mp3
      media_content_type: music
    entity_id: media_player.living_room_sonos
    service: media_player.play_media
  - delay: 00:00:05
  - data: {}
    entity_id: all
    service: sonos.restore
Bonus Ideas
Get an alert pushed to your phone
I use Pushover ($5) for a variety of different alerts, so I also added an action to my automation that notifies Pushover (which then sends an alert to my phone). You’ll need to set up a Pushover account and edit your configuration.yaml file for this to work.
Add a new action, with the following settings:
- Type:
call service - Service:
notify_pushover
Paste in the following code under service data:
	data:
	  priority: 1
	  url: 'https://homeassistant.example.com'
	message: The kitchen door was left open for longer than one minute.
	title: Kitchen Door Ajar
Stick a door sensor on your mailbox
The SmartThings door & window sensors have a pretty decent range - try sticking one on your mailbox. Here’s what I hear when the mail gets delivered:
(I turned this off after a few days, but you get the idea 😅)