Is your Home Assistant installation properly configured for secure remote access? Are you sure?
I ran a quick search on Shodan and found over 36,000 publically accessible Home Assistant installations with no SSL certificate installed. Every time one of these unlucky users logs in to Home Assistant remotely, their credentials are being transmitted in clear text across the public Internet. Any data being sent back and forth to Home Assistant - such as your location - is also being transmitted in clear text.
X Forwarding port 8123 on your router and calling it a day is a bad idea!
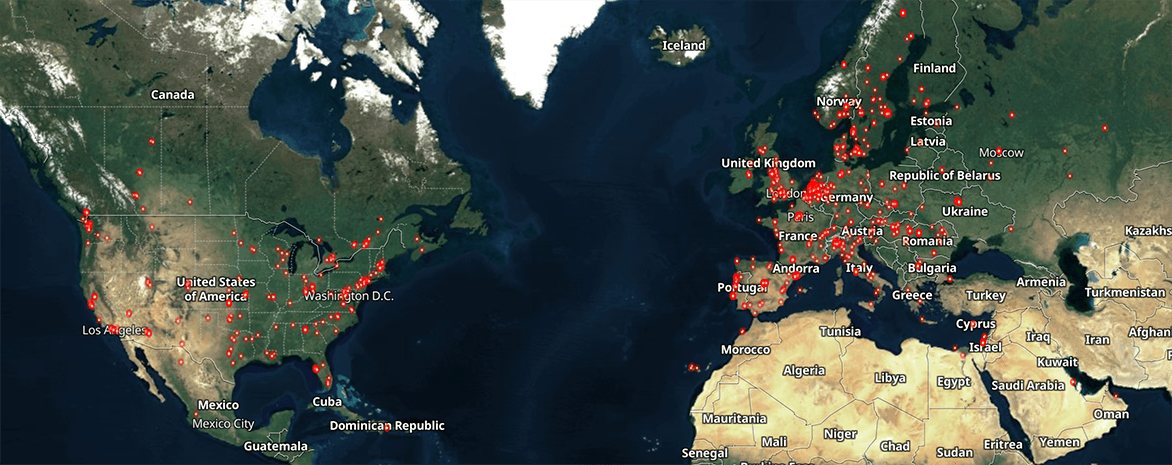 Each red dot represents a potentially insecure Home Assistant installation
Requirements
You’ll need the following:
- Standard Home Assistant installation
- Registered domain name
- Free Cloudflare account
- Domain nameservers pointed to Cloudflare
- Ability to modify your router’s firewall settings
- Static internal IP address/DHCP reservation for Home Assistant
What is Cloudflare, and why use them?
Cloudflare provides a variety of products that help make websites faster and more secure. In a nutshell, Cloudflare sits between your server and people trying to access your server - transparently blocking bad actors before they reach your website.
By using Cloudflare, any access to your Home Assistant installation from the public Internet first goes through Cloudflare’s servers - hiding your true public IP address, and letting you use their advanced security tools.
Cloudflare Configuration
For Cloudflare to function, you’ll need to create a Cloudflare account, and then tell your domain registrar to use Cloudflare’s nameservers for your domain.
Add your subdomain
You’ll need to come up with a subdomain that you will use to access Home Assistant. For this guide, I’ll use homeassistant.labzilla.io.
Log in to the Cloudflare dashboard, and click on your site. Click on DNS in the top menu bar, and then click Add Record.
Leave Type (A), TTL (Auto), and Proxied at their default settings. Under Name, enter the first part of the subdomain only. Under IPv4 address, enter your network’s public IP address.
- If you aren’t sure what your public IP address is, use ifconfig.me or IP Chicken to find out.
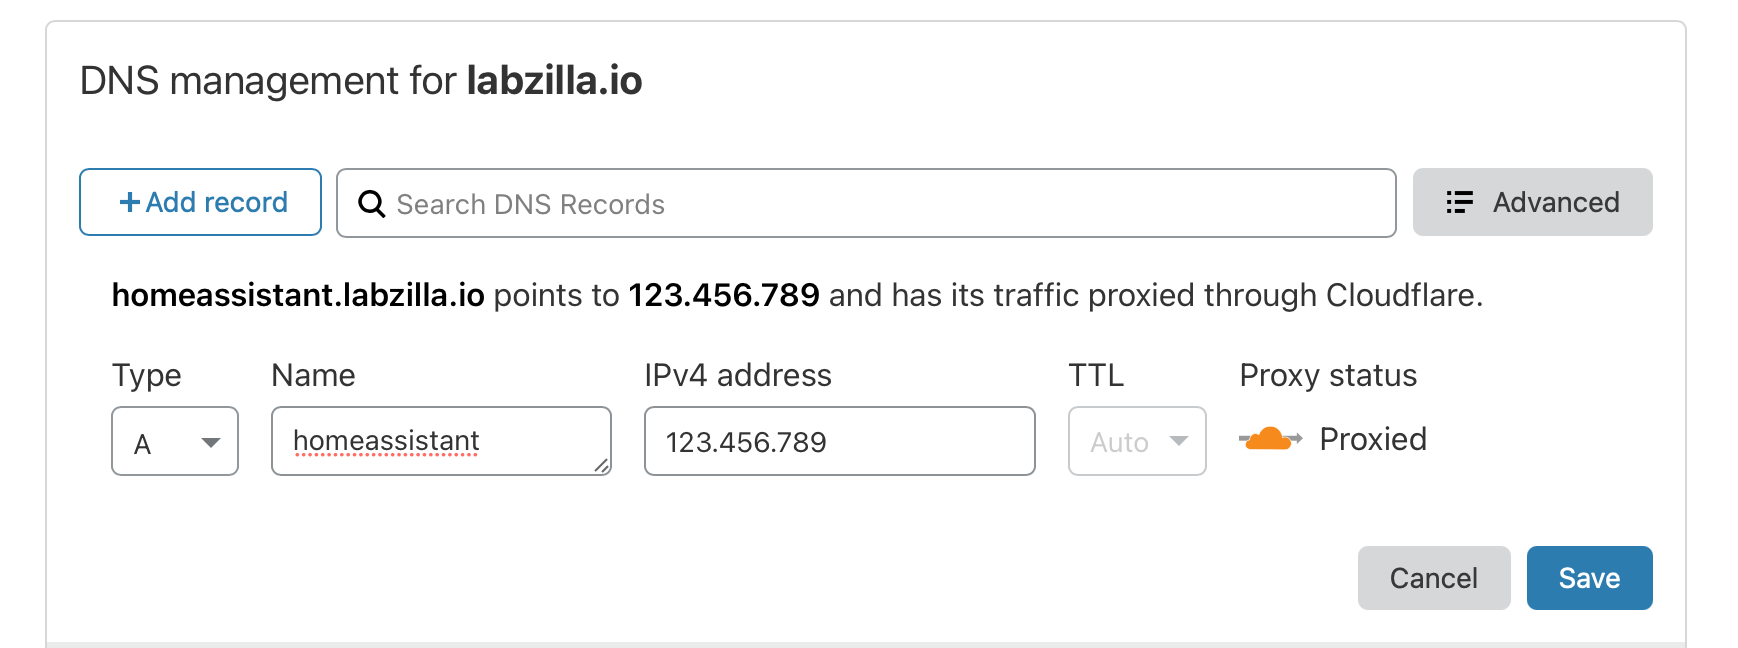
Click the blue Save button.
Obtain your API Key
We will need your Cloudflare Global API key to configure Home Assistant.
From the Cloudflare dashboard, click on the My Profile account icon in the top right corner, and then click My Profile. Click on API Tokens, and then click the View button for the Global API Key item. You will be asked to enter your password, and then your Global API Key will be displayed. Save this somewhere secure - it’s equivalent to your password.
Configure Home Assistant
Now that Cloudflare is set up, we need to configure Home Assistant to (1) automatically get an SSL certificate, (2) use the SSL certificate for the web interface, (3) periodically check to see if your external IP address changed, (4) and update Cloudflare accordingly.
This tutorial assumes you are using the standard Home Assistant image. If you have have Supervisor listed on the left hand menu, you’re using the standard image. If you’re using Home Assistant Core, use certbot-dns-cloudflare to obtain an SSL certificate outside of Home Assistant, and edit your configuration.yaml file as outlined below.
Install & Configure Let’s Encrypt Add-On
Cloudflare automatically encrypts the connection between your browser and Cloudflare’s network, however the connection between your Home Assistant server and Cloudflare still needs protection.
Let’s Encrypt is a service that provides free, automated TLS/SSL certificates that can be used to encrypt website traffic. These certificates need to be renewed every 90 days - which Home Assistant can automatically take care of. We will use this certificate to encrypt traffic between Home Assistant and Cloudflare.
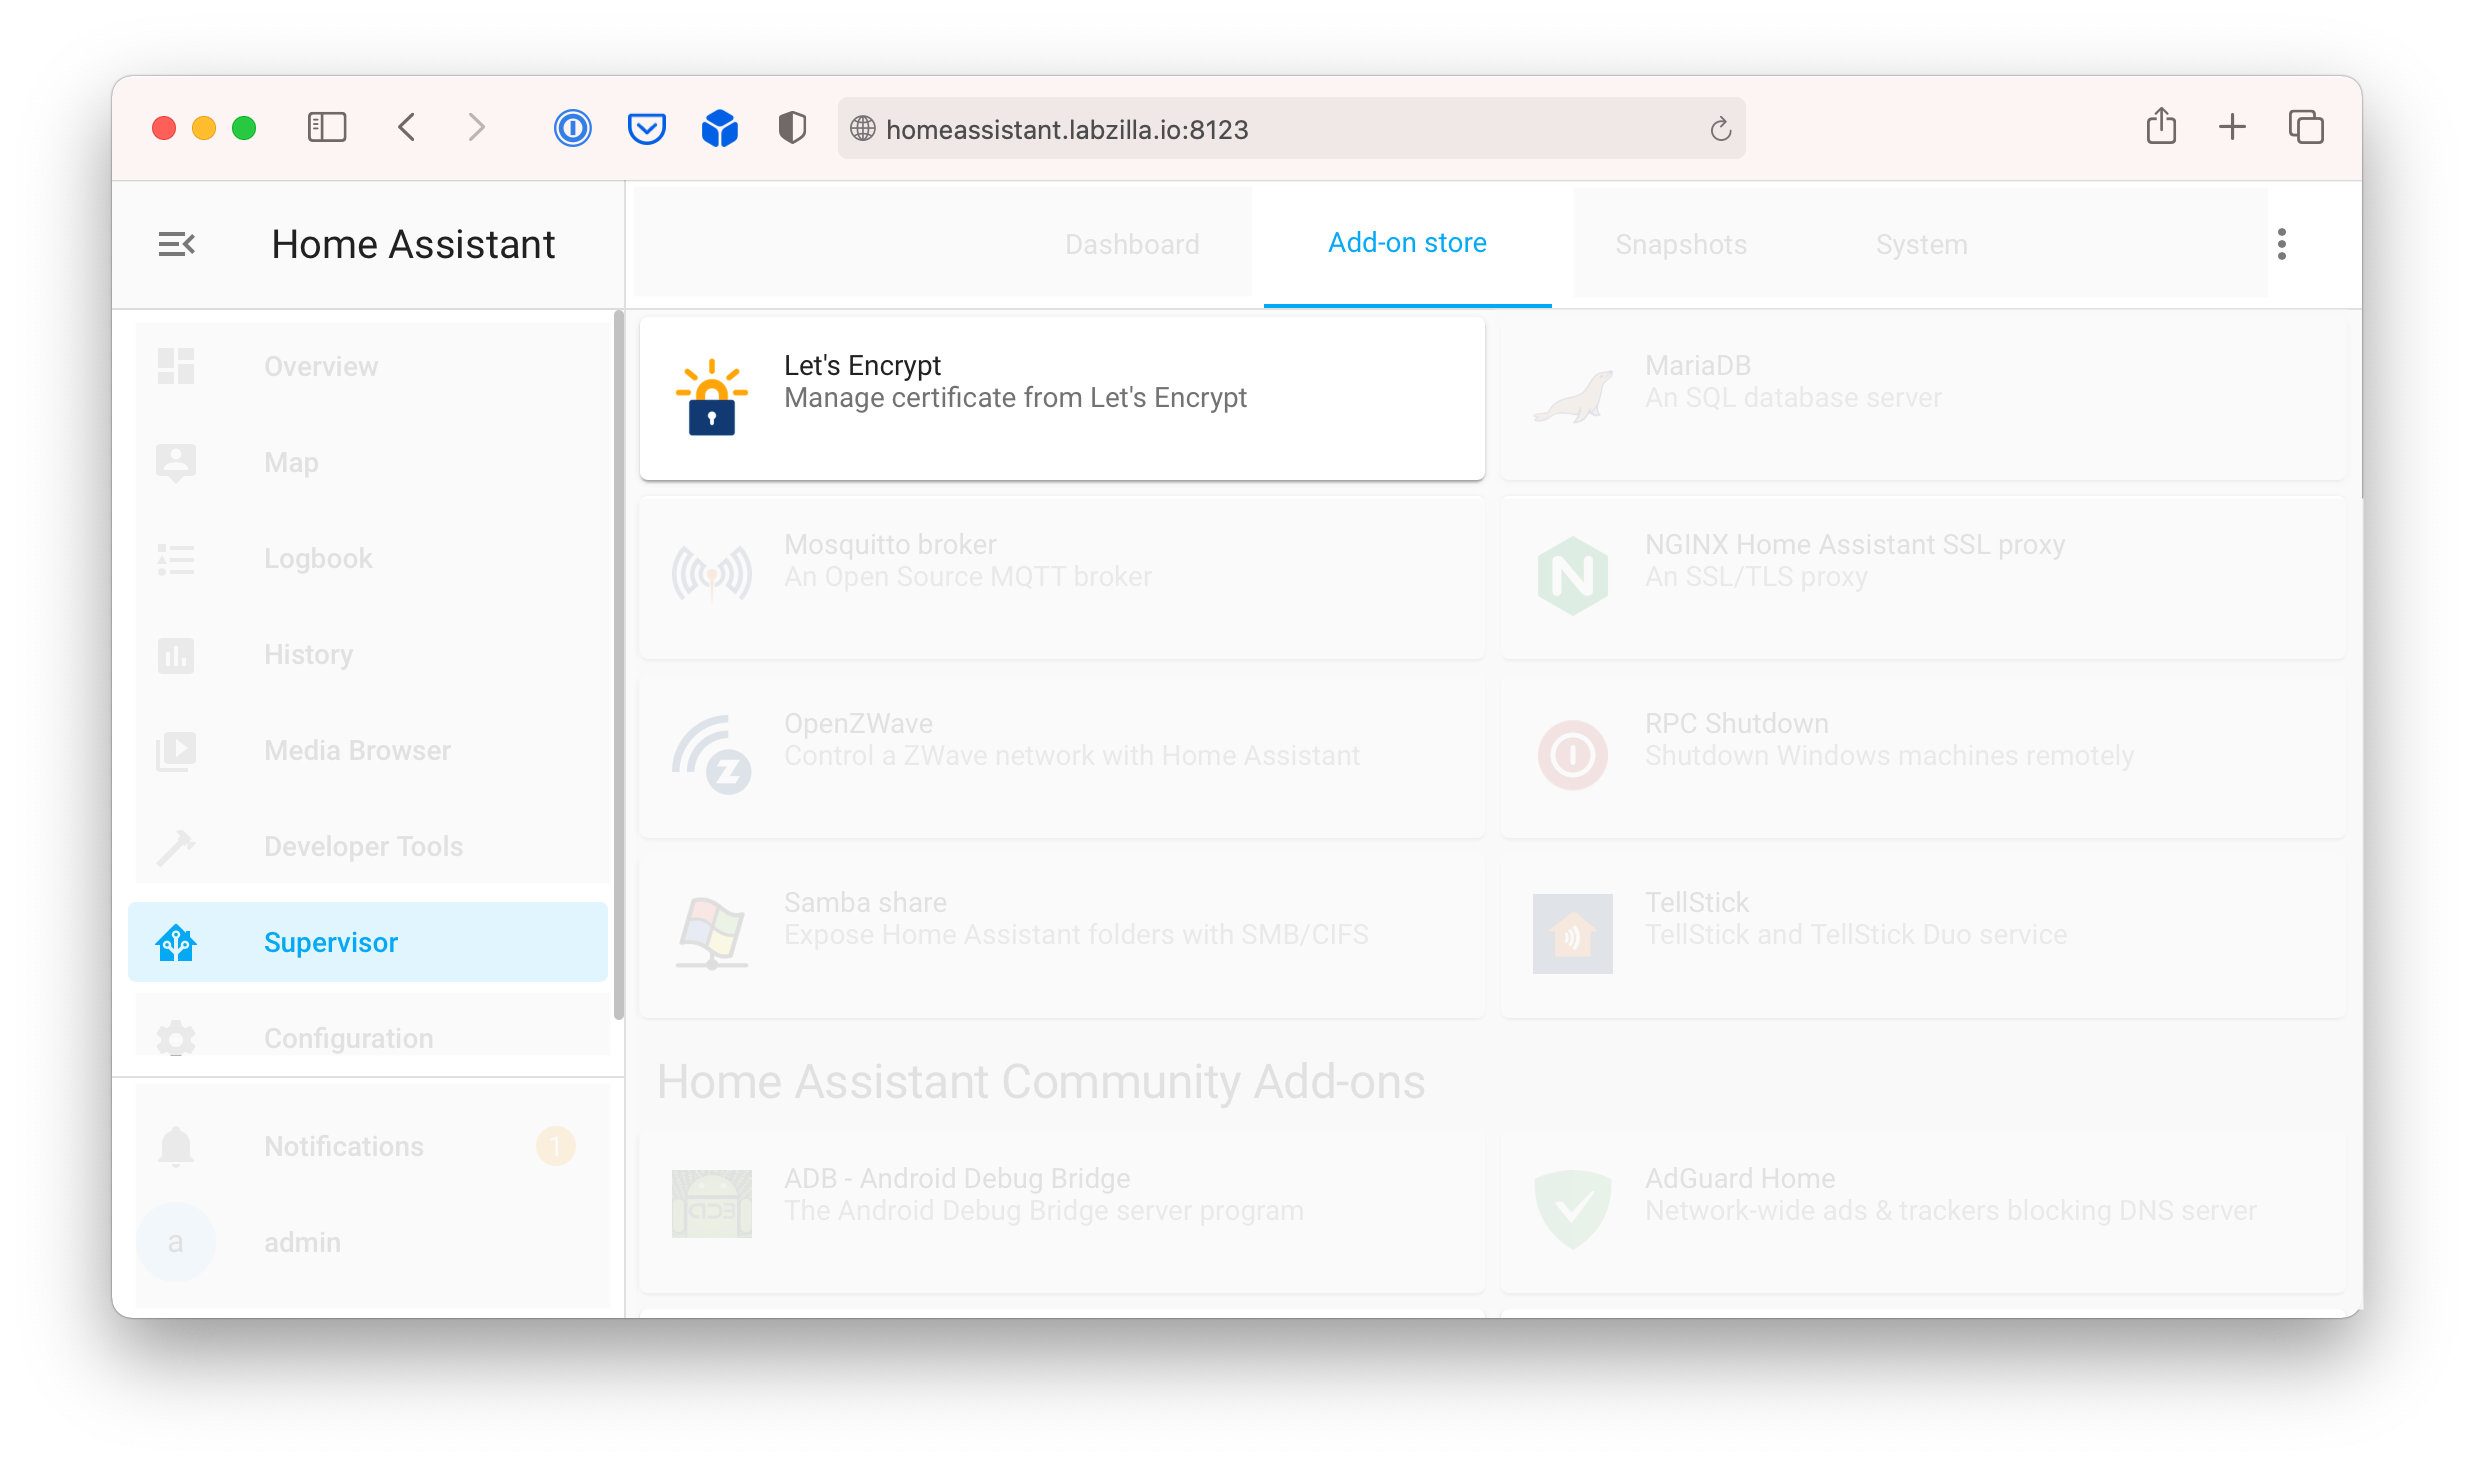
First, we need to install the Let’s Encrypt add-on.
- Open Home Assistant, and click on Supervisor in the left hand menu.
- Click Add-on store on the top menu, and click Let’s Encrypt.
- Click Install and wait for the installation to complete.
Toggle the Start on boot option to on, and then click Configuration in the top menu.
Paste in the following configuration, and then click Save.
email: [email protected]
domains:
  - labzilla.io
certfile: fullchain.pem
keyfile: privkey.pem
challenge: dns
dns:
  provider: dns-cloudflare
  cloudflare_email: [email protected]
  cloudflare_api_key: YourGlobalAPIKey
Edit Home Assistant configuration.yaml
Next, we need to manually edit the Home Assistant configuration file to tell Home Assistant to (1) start using the new HTTPS certificate, and (2) automatically update Cloudflare with our current IP address.
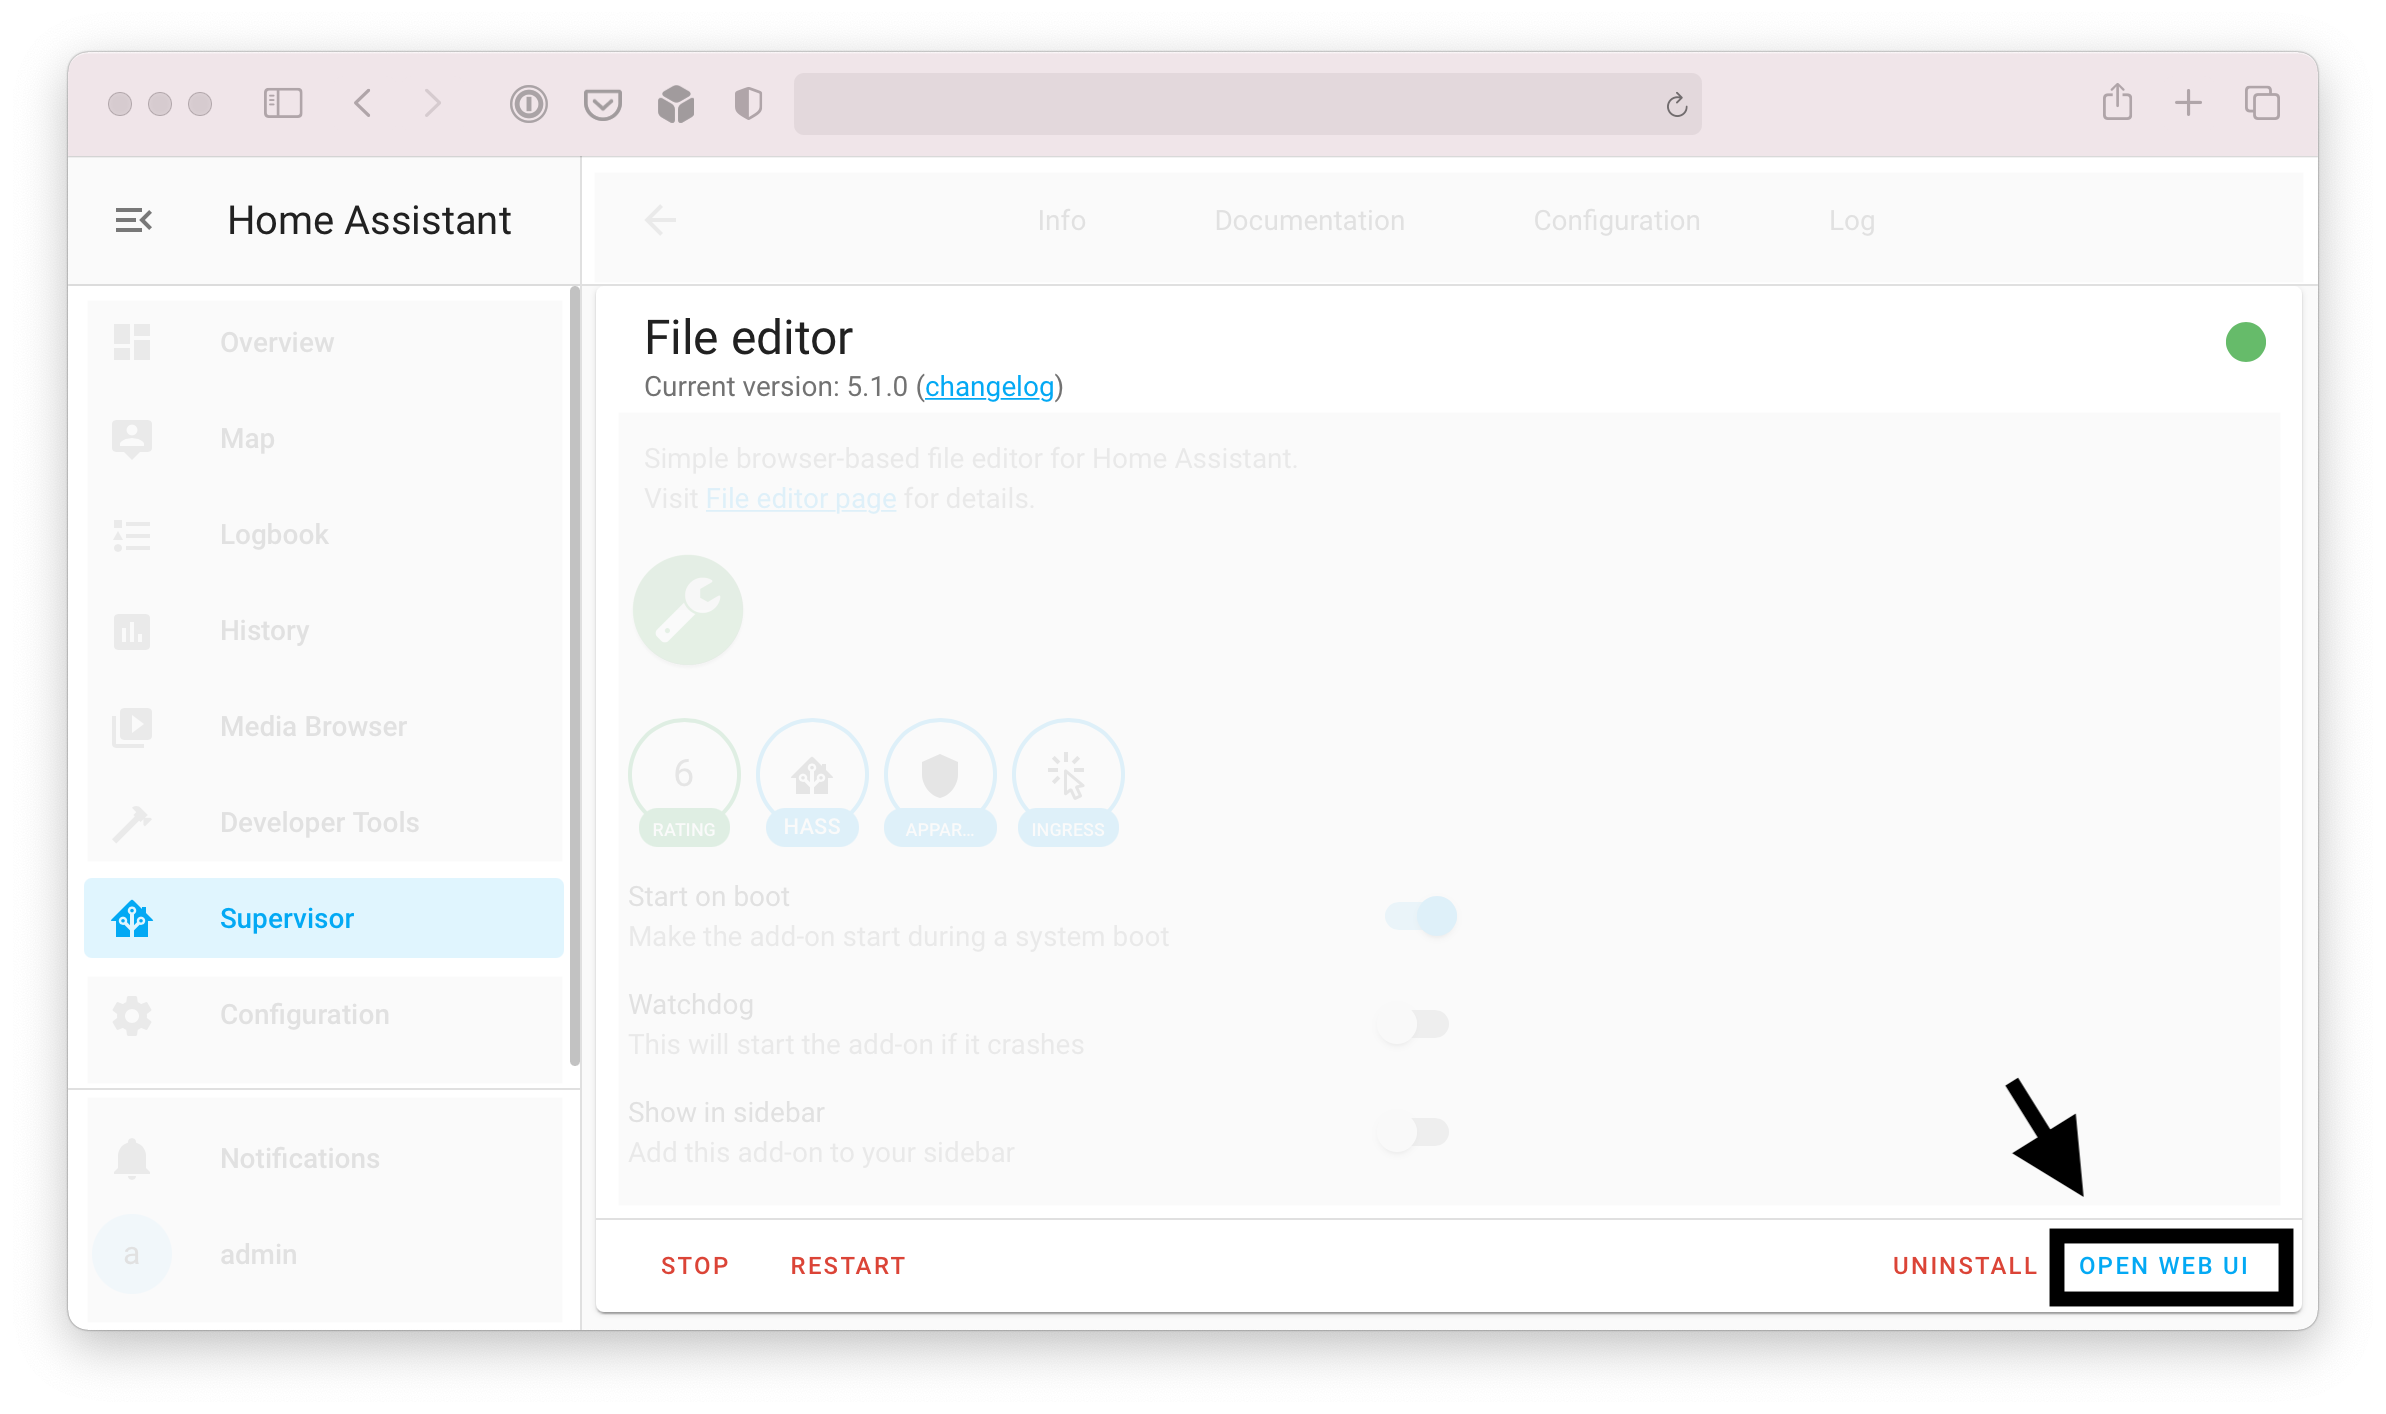
Install File Editor
To edit your configuration.yaml file in Home Assistant, you need to have their File Editor plug-in installed.
- Click on Supervisor in the left hand menu.
- Click Add-on store, and then click on File Editor
- Click Install and wait for the installation to complete.
Once the installation is complete, click Start and then click Open Web UI.
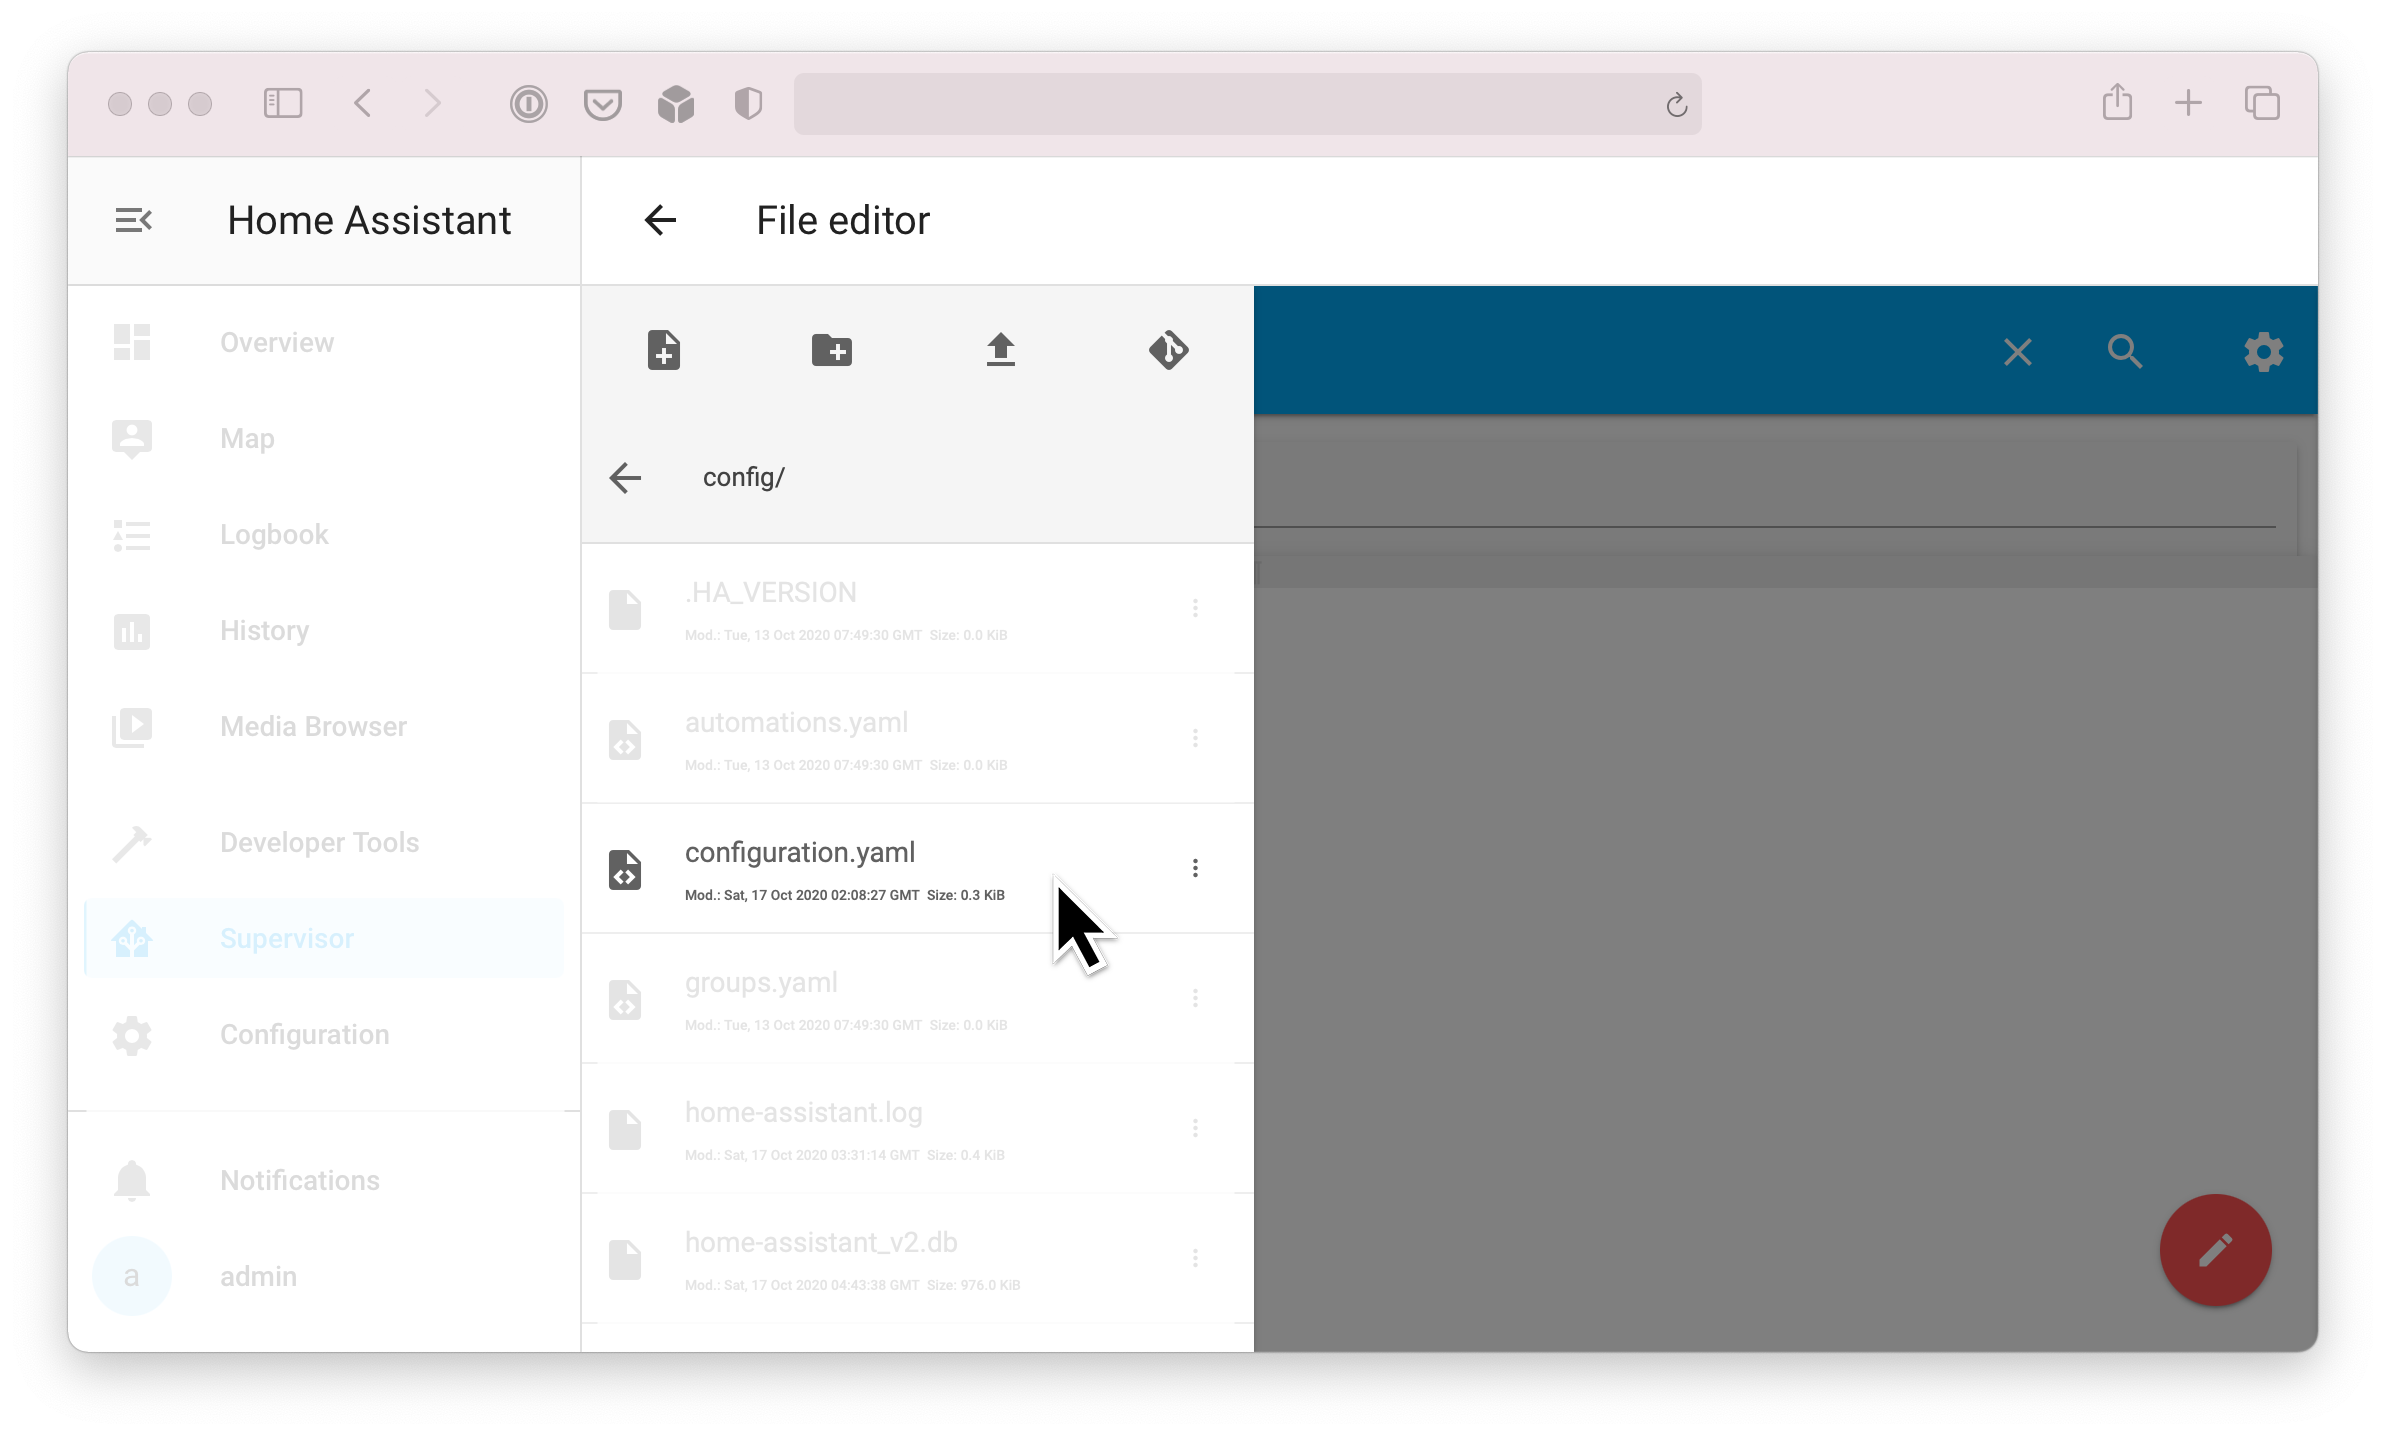
Click the folder icon in the blue menu bar at the top.
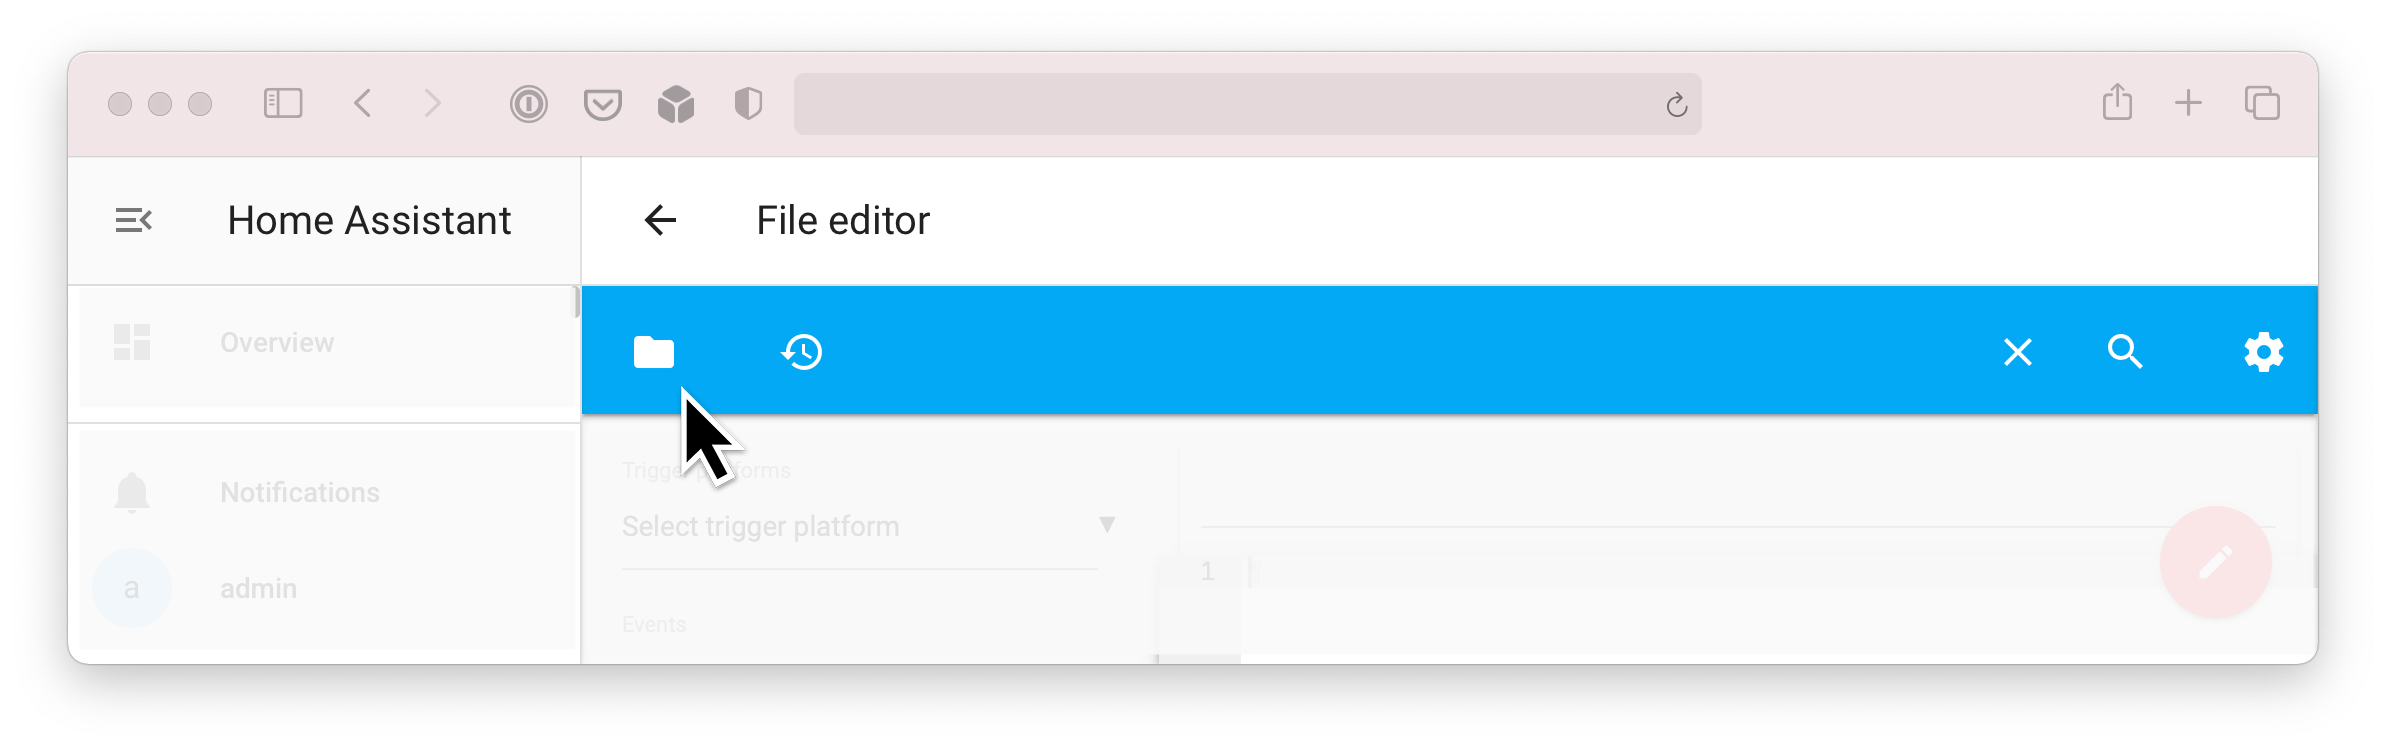
Finally, click configuration.yaml to open your configuration file.
HTTPS/SSL Certificate
Paste the following into your configuration.yaml file to tell Home Assistant to start using your new SSL certificate.
http:
  server_port: 8123
  ssl_certificate: /ssl/fullchain.pem
  ssl_key: /ssl/privkey.pem
Cloudflare IP Address Updater
If you are on a residential Internet connection, you likely have a dynamic public IP address that can change at any time. Home Assistant can run a check every hour for changes, and update Cloudflare if your IP changes.
Paste the following into your configuration.yaml file. Your zone should be your domain, and the records will be any subdomains you wish to update. Use the same Global API Key that was used above.
cloudflare:
  email: [email protected]
  api_key: YourGlobalAPIKey
  zone: labzilla.io
  records:
    - homeassistant
Click the save icon in the top menu bar, and restart Home Assistant (Configuration > Server Controls > Restart Home Assistant).
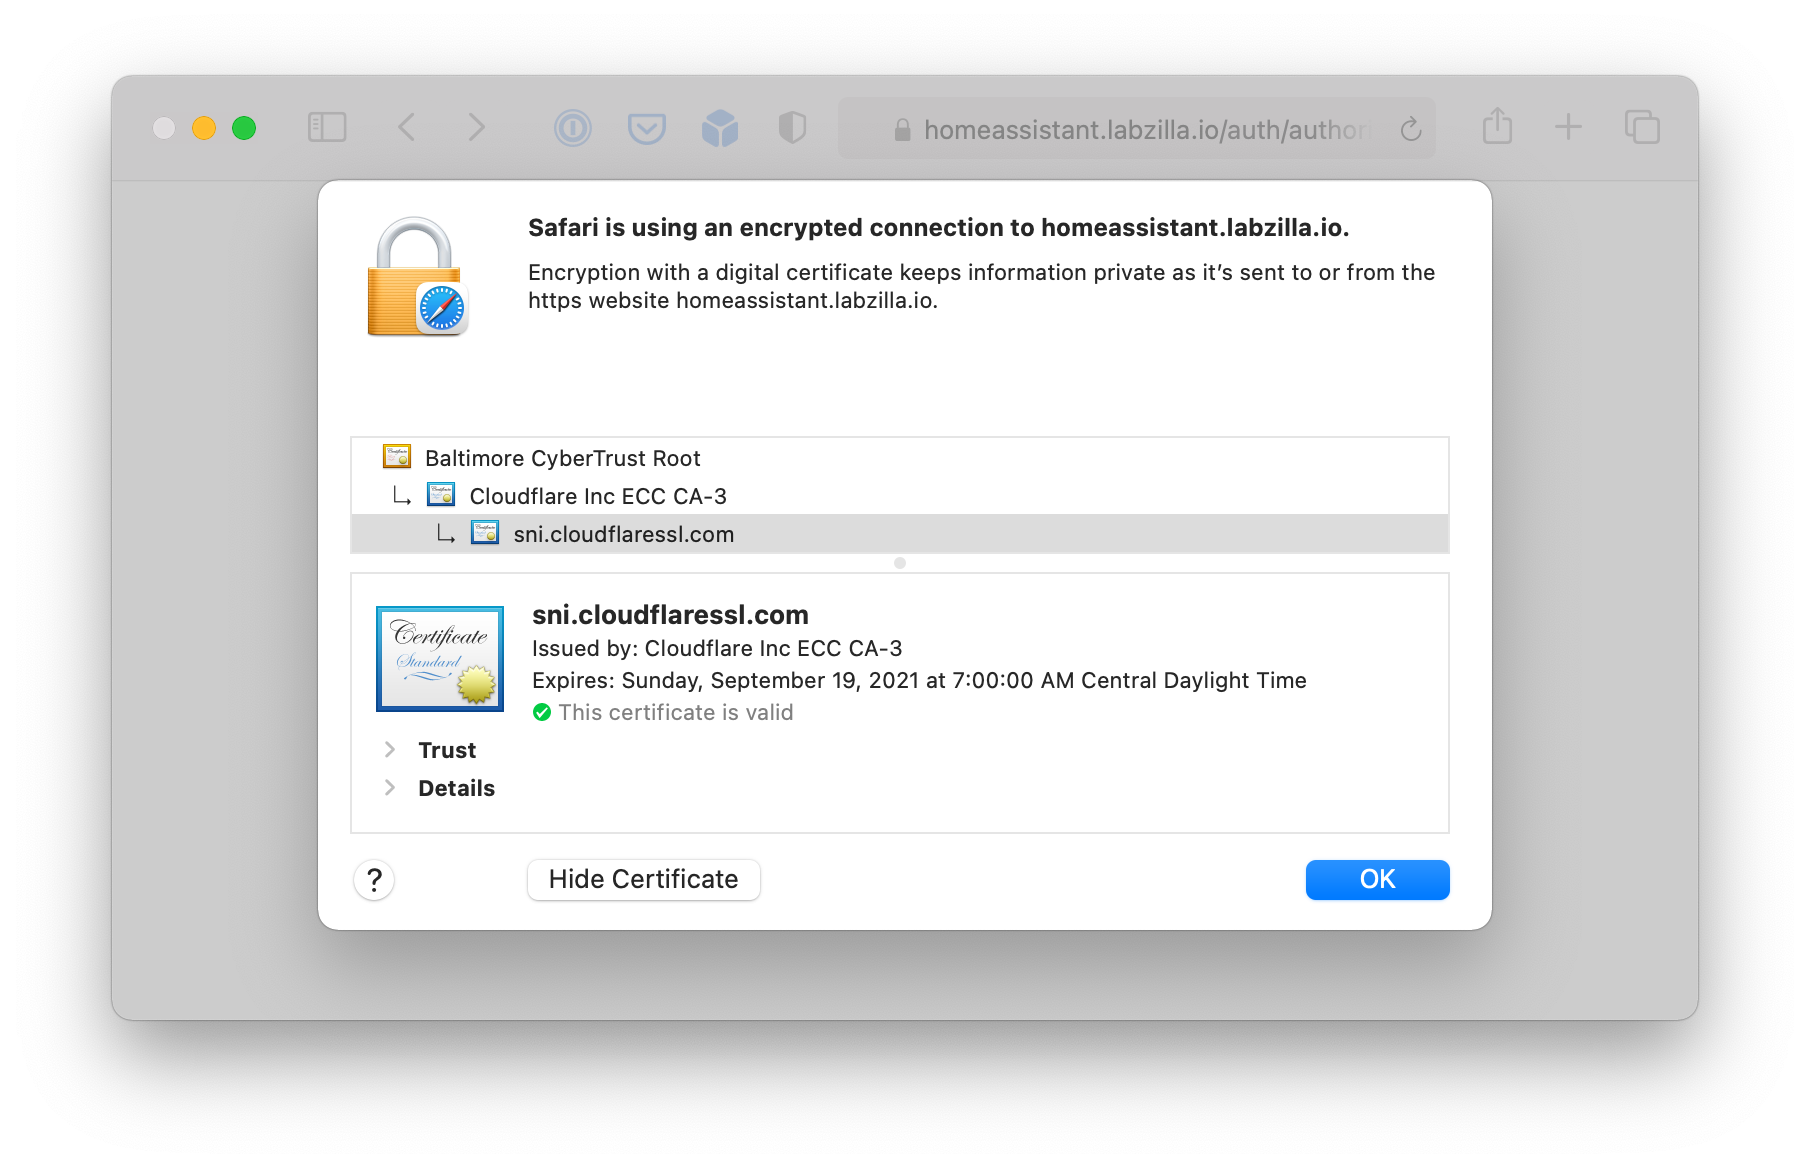
You should now be able to access Home Assistant via https. You may receive a certificate error if you are accessing Home Assistant by IP address - you should configure an internal DNS record for your Home Assistant subdomain that resolves to your internal IP address for Home Assistant.
Configure your firewall
Finally, you need to configure your router/firewall’s NAT/port forwarding settings. The specific terminology will vary based on your router/firewall model; this example is based on PFSense. Check the documentation for your specific model of router/firewall if you aren’t familiar with how to configure these settings.
| Setting | Value |
|---|---|
| Interface | WAN |
| Protocol | TCP/UDP |
| Source | Cloudflare’s IPv4 range (see below) |
| Source Port | 443 |
| Destination | WAN Address |
| Redirect Target IP | Local IP address of Home Assistant |
| Redirect Target Port | 8123 |
Cloudflare has a public list of the IP addresses they own and control. In the previous step, we configured Cloudflare to proxy all traffic to our homeassistant.labzilla.io domain name. Since all traffic is going through Cloudflare, their IP addresses will be the only source of legitimate outside traffic to Home Assistant. We can block everything else.
Test it out
Your Home Assistant installation should now be securely protected by Cloudflare, and our router’s firewall rules should block any attempts to connect that don’t come from Cloudflare. Test this out from a different Internet connection (i.e., tethering through your cell phone’s hotspot).
Navigate to your Home Assistant installation by using your public IP address.
The request should fail/time out, because the request did not originate from one of Cloudflare’s IP addresses.
- If the request does not fail/time out:
- You should receive a certificate warning message.
- Verify that the SSL certificate is from Let’s Encrypt, and that it is for your subdomain.
- Double-check your firewall rules to make sure you are only allowing Cloudflare’s IP address range
Ping your Home Assistant subdomain
The IP address responding to the ping should be from one of Cloudflare’s IP addresses, and not your home IP address.
- If the IP address responding matches your home IP address, double check your Cloudflare settings and make sure that the proxy status is correct.
Navigate to your Home Assistant installation by using your domain name
Your Home Assistant installation should load, and the SSL certificate should be from Cloudflare.
Further configuration
There are a few more tweaks that you can make to further protect Home Assistant.
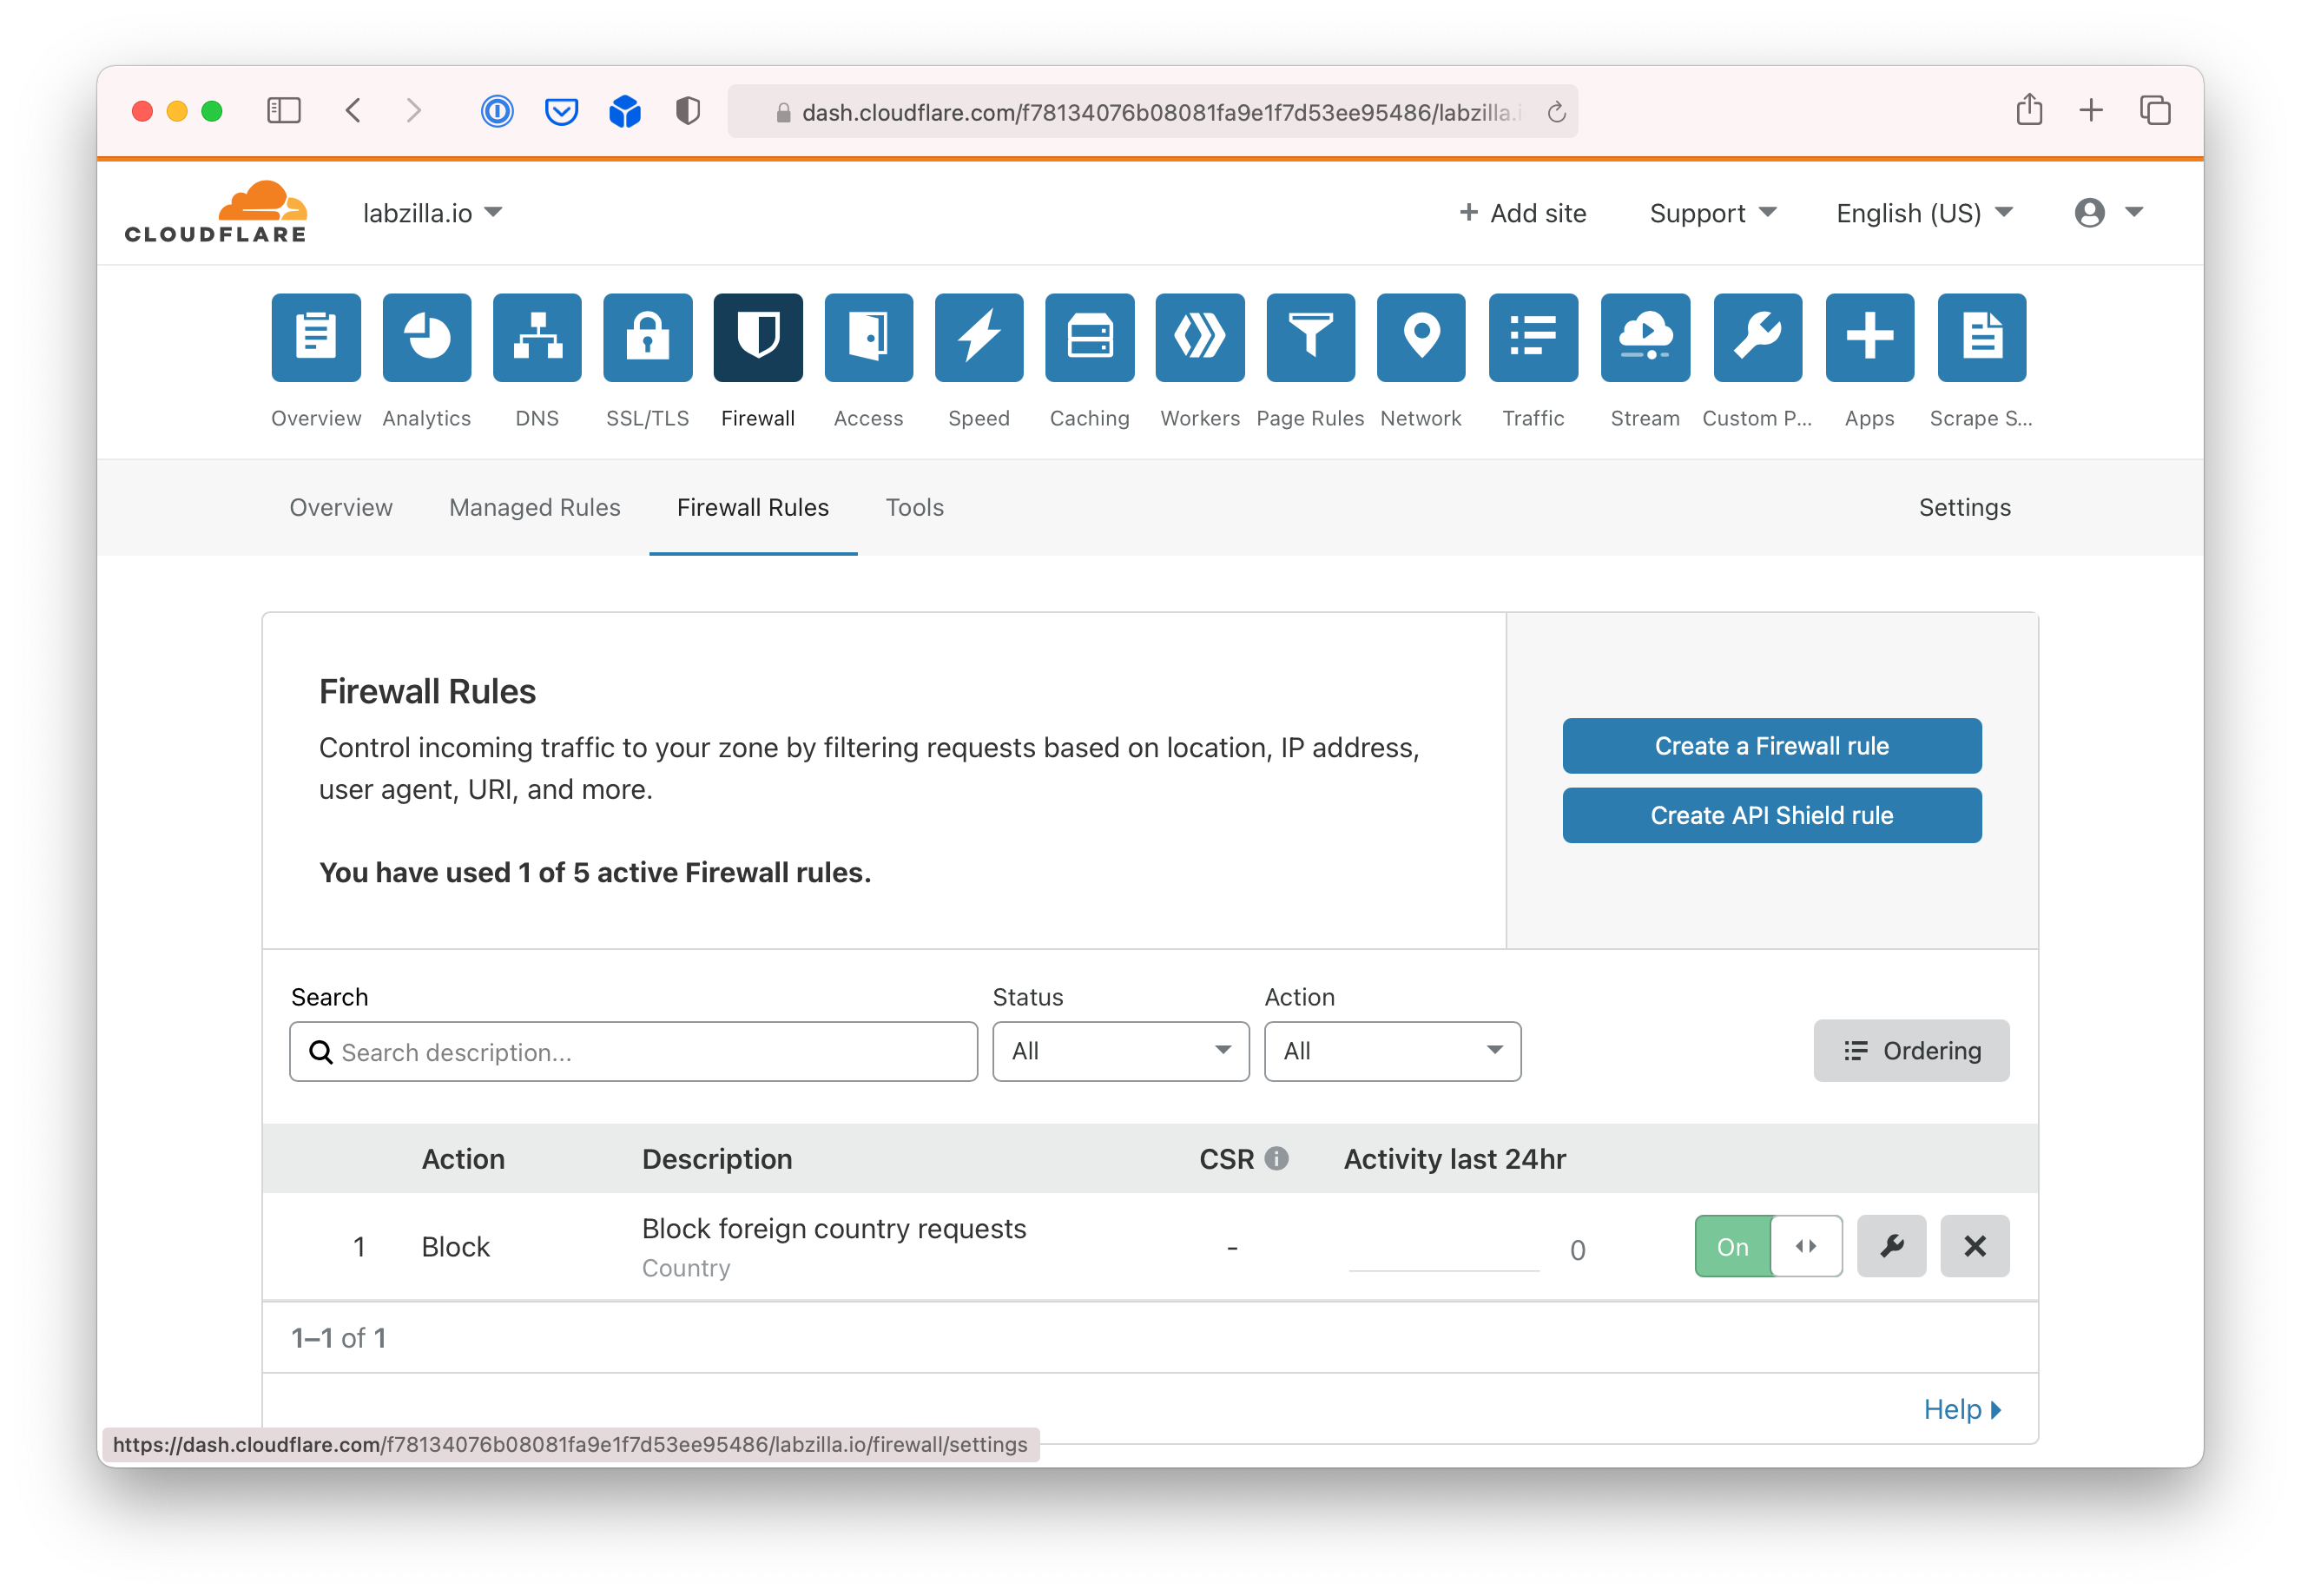
Cloudflare Firewall Rules
You can use Cloudflare’s firewall rules to restrict access to Home Assistant. For example, you can block access from all countries except the one that you live in. Access Cloudflare’s firewall rules from the Cloudflare dashboard; select your domain, choose Firewall from the top menu, and then click Firewall Rules.
Turn on multi-factor authentication
You should also turn on multi-factor authentication within Home Assistant. This can be configured in the profile section of your account.